Wednesday, May 30, 2018

Technique: PanPastels on Black Paper

PanPastels are my favorite coloring tool, and I find myself constantly looking for new ways to use them. It's easy to always reach for white paper when you're planning to stamp and color, but why not try something totally different?


Here's a fun technique that you can try with PanPastels. They look amazing on black paper! Here, I used Black Licorice embossing powder to emboss several flowers on Black Licorice cardstock, using the Pretty Petals stamp set by FJS (retiring June 30). Then I used the Sofft Tools wand with the "slipper" tip to apply four colors of PanPastels: Whip Cream and Pool Play on the small flowers, and Sweet Berry and Banana Cream on the large flowers. 


I added a few "dew drops" of Journey Glaze, and a white embossed sentiment from the Good Karma stamp set (also retiring June 30.) The result is a striking but simple card that you can complete in just a few minutes. This technique would make a beautiful sympathy card as well.

Tip: You do not need to set PanPastels with any kind of fixative, as they cure on their own in about 24 hours. However, if you choose to use a fixative, please be sure to use a very light coating of artist-grade fixative so that it won't change the color of your pastels, or degrade to yellow over time. Many people mistakenly use hairspray, which will turn yellow within about a year. Your work is ART! Treat it accordingly.


Supplies List

Stamps: Pretty Petals, Good Karma
Inks: Clear Pigment Ink
Cardstock: Black Licorice
Coloring Tools: PanPastels, Black Licorice Embossing Powder, Whip Cream Embossing Powder
Adhesives: Journey Craft Glue, Journey Foam Squares, Journey Glaze

To purchase these supplies and so much more, visit my FSJ store front.

Tuesday, May 22, 2018

Grandma's Hummingbird

My late grandmother adored hummingbirds, and she had several feeders hanging just outside her living room window. We would watch them flittering about for hours on end. It's one of my favorite memories from my childhood. I made this card in honor of my Grandma and her favorite species, the Ruby-Throated Hummer.


First, I created the background using red and orange PanPastels to create a sunset effect. Then I layered Whip Cream cardstock onto a White Liner (sticky paper) sheet, and die cut the Floral View background, peeled the sticker backing off and adhered it to my card. Next, I heat embossed the "thank you" sentiment from Embroidered Greetings, onto a strip of Black Licorice cardstock.


Next, I used Clear Pigment Ink to stamp the bird on Whip Cream cardstock. Then I gently rubbed Panpastels over the ink to create the colored feathers of the bird. I die cut him with the coordinating dies, and then sponged the edges with black ink.


Finally, I spiraled a length of Black Licorice twine and tacked it down in a few places with Mini Glue Dots before layering on the bird using Foam Squares. This loop of twine gives the feeling of motion to mimic the constant flutter of a hummingbird's tiny wings. A few strategically placed Cut Rhinestones and some Sparkle Silk on the feathers finishes off this card for a dear friend.

Supplies List

  • Stamps: Sweet Petunias, Embroidered Greetings
  • Dies: Sweet Petunias, Floral View
  • Inks: Clear Pigment Ink
  • Cardstock: Whip Cream, Black Licorice
  • Coloring Tools: PanPastels, Sparkle Silk, Whip Cream Embossing Powder
  • Embellishments: Black Licorice Twine, Cut Rhinestones
  • Adhesives: Journey Craft Glue, Journey Foam Squares, Mini Glue Dots
To purchase these supplies and so much more, visit my FSJ store front

Saturday, May 5, 2018

A Bushel & a Peck...of Pickles!

My mom has canned her own vegetables and herbs every year since I was a kid, and I'm especially fond of her dill pickles. I made this summery card for her for Mother's Day, using the FSJ patterned paper called Sunday Adventure Prints, and the coordinating stamp set, "Bushel and a Peck." 


Using three different colors of green ink, I stamped jars of pickles (with sprigs of dill!) and snap peas. I coated the jars in Journey Glaze to make them look like glass, and topped them off with lids stamped in silver ink. I added a few finishing touches with Black Licorice gingham ribbon, three little pearls, and a tiny heart tag with a pop of red. It's those little details that really make a card special. 

Supplies List

  • Stamps: Bushel and a Peck
  • Inks: Electric Lime, Lemongrass, Kiwi Slice, Black Licorice, Cranberry Crisp, Journey Silver
  • Cardstock: Whip Cream, Black Licorice, Lemongrass, Sunday Adventure Prints
  • Embellishments: Black Licorice Gingham Ribbon, Pearls
  • Adhesives: Journey Craft Glue, Journey Foam Squares, Mini Glue Dots, Journey Glaze
To purchase these supplies and so much more, visit my FSJ store front

Wednesday, May 2, 2018

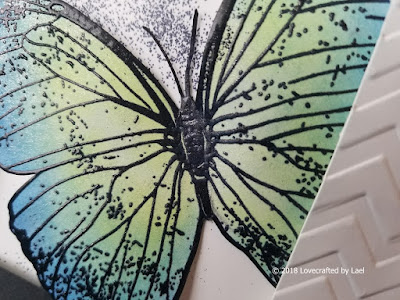
Technique: Butterfly Dust

I just love the huge butterfly in the Bold Wings stamp set and I'll be sad to see it retire on June 30, 2018. This image can be a little daunting at first because it barely fits onto an A2 sized card, and does't leave any room for anything else. But get yourself used to the idea of only using a portion of a stamp on your card. In this case, I've cut off nearly half of the butterfly by tucking it under a textured frame. The result is a unique and visually appealing card that will wow your recipient.


The butterfly is heat embossed in Black Licorice, and then colored using PanPastels. There are only two colors used here, a pale yellow and a rich blue, but where they meet creates a lovely shade of minty green. PanPastels blend together so easily.


The frame is created with a chevron embossing folder, but you could use any design you prefer. I simply cut a rectangle slightly larger than the card base, ran it through the embossing folder, and then used my Journey Paper Trimmer to cut out the interior rectangle. You could also use Journey Rectangle dies to make it even easier. The just pop up the frame using foam tape, and tuck the wings underneath.


As a finishing touch (before layering everything together), I've sprinkled a bit of loose embossing powder just above the butterfly. I used the Journey Heat Tool from underneath to set the powder without blowing it away, since it's not adhered with ink in the traditional manor. This results in a sprinkle of shiny dust that resembles the dust of butterfly wings. Be sure to curl the wings with your Crease Tool and prop them up with a double layer of Journey Foam Squares so they appear lifelike. And finally, coat the whole butterfly with Sparkle Silk diluted with a few drops of water, to create that beautiful butterfly shimmer. 


Supplies List

  • Stamps: Bold Wings, Small Things
  • Dies: Journey Rectangles, Chevron Embossing Folder
  • Inks: Clear Pigment Ink
  • Cardstock: Whip Cream, Black Licorice
  • Coloring Tools: PanPastels, Sparkle Silk, Whip Cream Embossing Powder, Black Licorice Embossing Powder
  • Adhesives: Journey Craft Glue, Journey Foam Squares, Mini Glue Dots, Foam Tape
  • Tools: Journey Heat Tool, Journey Paper Trimmer, Media Tray, Details Pro Shears
To purchase these supplies and so much more, visit my FSJ store front